Applications deployed in this repository are a starting point to get environment into production.
CNOE Azure Reference Implementation
This repository provides a reference implementation for deploying Cloud Native Operations Enabler (CNOE) components on Azure Kubernetes Service (AKS) using GitOps principles.
Table of Contents
- Architecture
- Important Notes
- Prerequisites
- Installation Flow
- Security Notes
- Installation Steps
- Usage
- Update Component Configurations
- Uninstall
- Contributing
- Troubleshooting
- Potential Enhancements
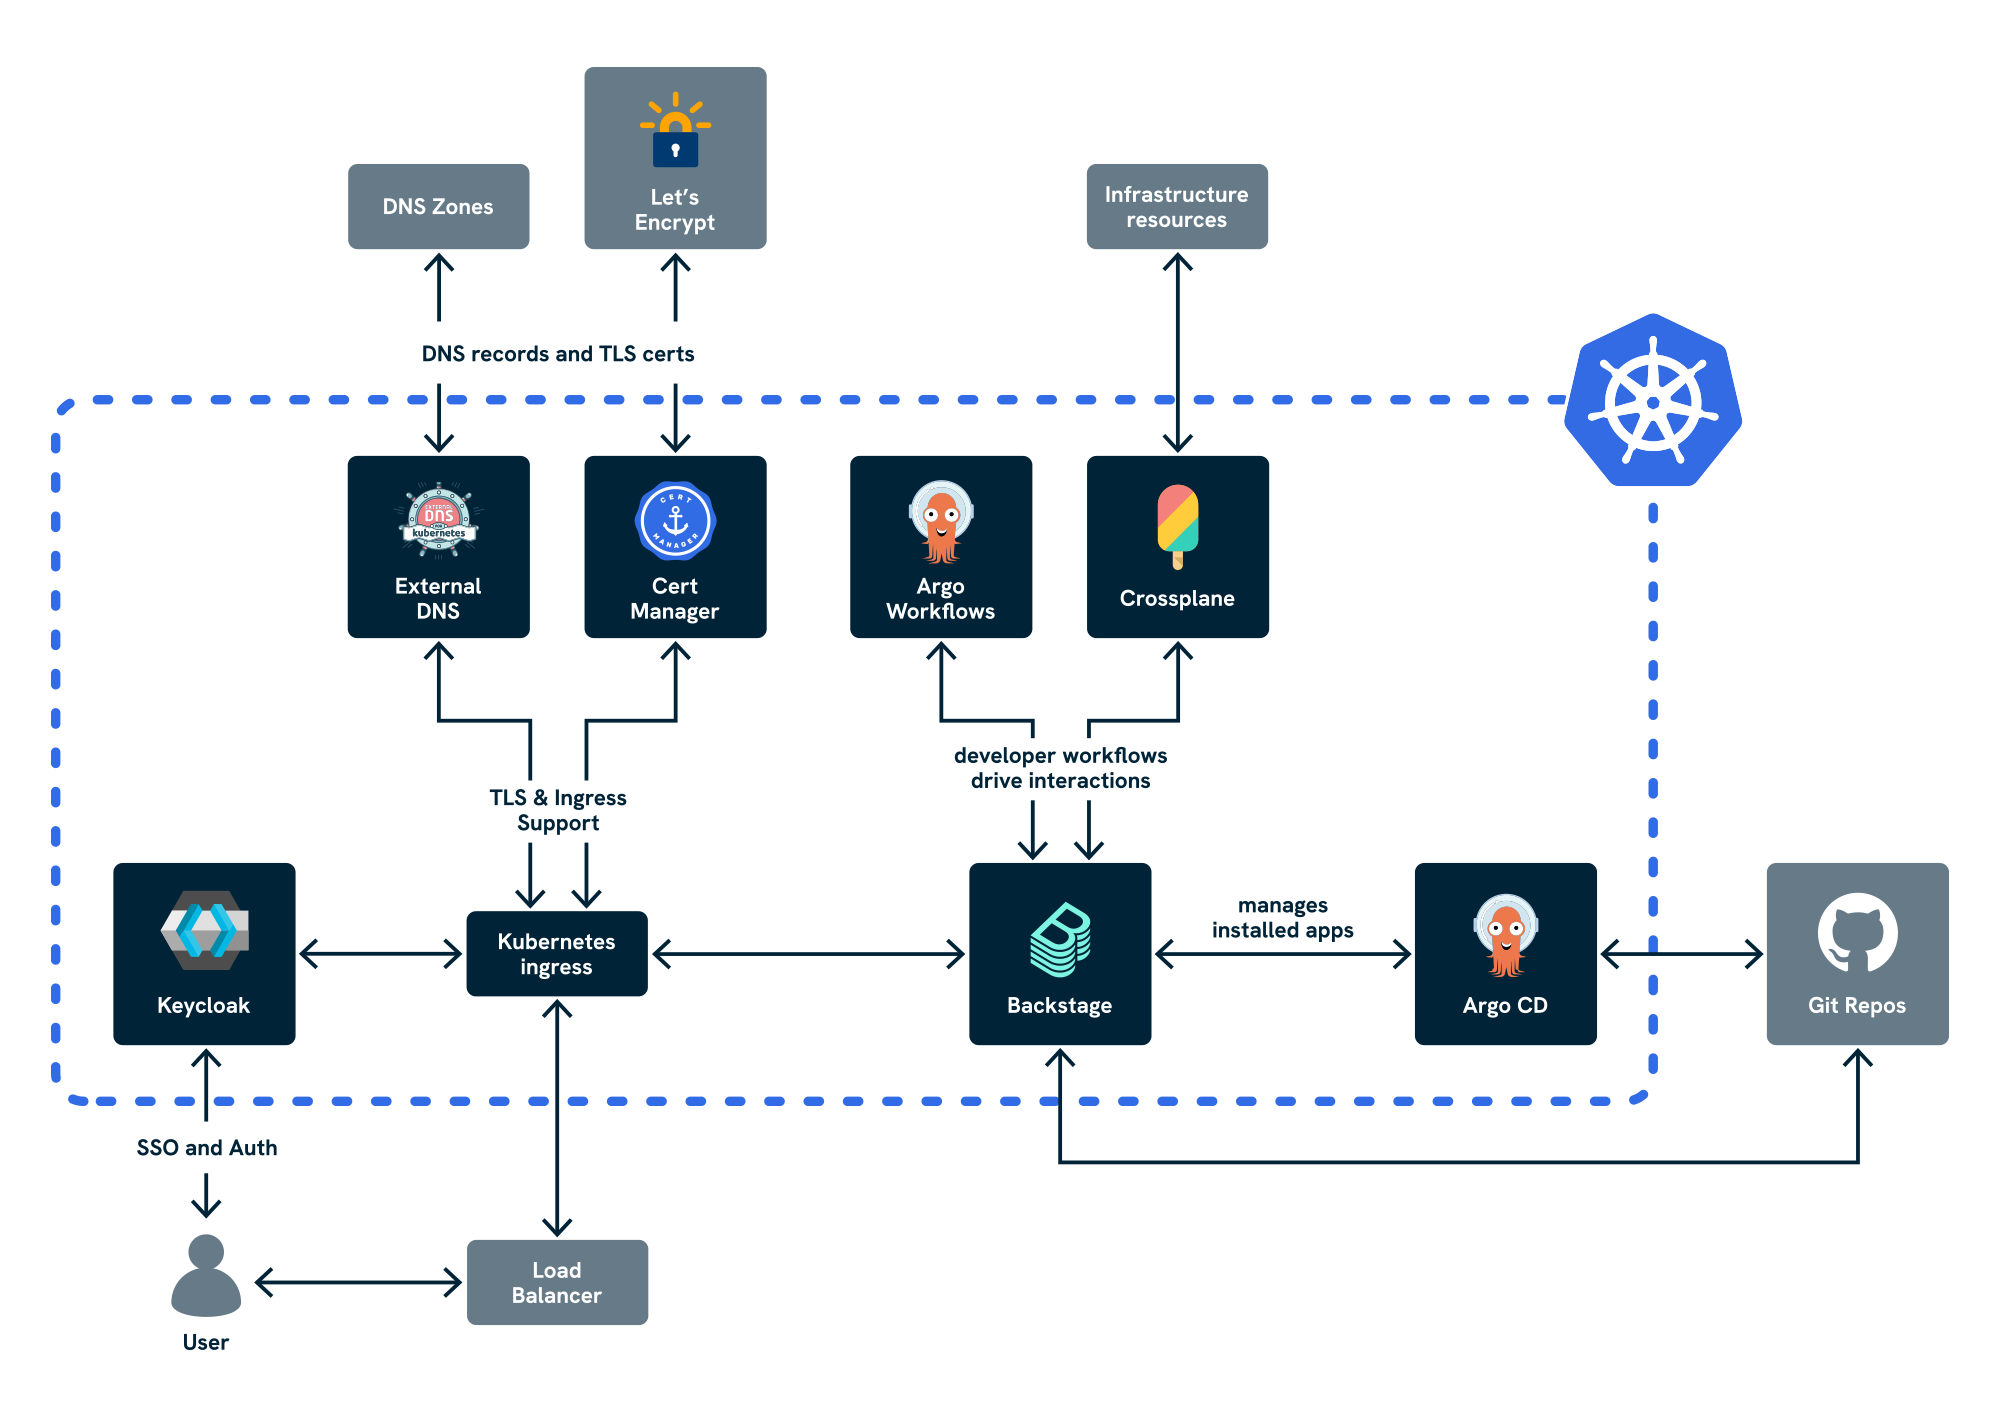
Architecture
- Installation is managed through Taskfile and Helmfile
- See TASKFILE.md for information about the tasks defined in the
Taskfile.ymlfile.
- See TASKFILE.md for information about the tasks defined in the
- Uses a local Kind cluster as a bootstrap environment to deploy CNOE to the target AKS cluster
- Components are deployed as ArgoCD Applications
- Uses Azure Workload Identity for secure authentication to Azure services (created automatically via Crossplane)
- Files under the
/packagesdirectory are meant to be usable without modifications - Configuration is externalised through the
config.yamlfile
Deployed Components
| Component | Version | Purpose |
|---|---|---|
| ArgoCD | 8.0.14 | GitOps continuous deployment |
| Crossplane | 2.0.2-up.4 | Infrastructure as Code |
| Ingress-nginx | 4.7.0 | Ingress controller |
| ExternalDNS | 1.16.1 | Automatic DNS management |
| External-secrets | 0.17.0 | Secret management |
| Cert-manager | 1.17.2 | TLS certificate management |
| Keycloak | 24.7.3 | Identity and access management |
| Backstage | 2.6.0 | Developer portal |
| Argo-workflows | 0.45.18 | Workflow orchestration |
Important Notes
- Azure Resource Management: This repository does not manage Azure infrastructure. AKS cluster and DNS zone must be provisioned separately using your organization's infrastructure management approach.
- Production Readiness: The helper tasks in this repository are for creating Azure resources for demo purposes only. Any production deployments should follow enterprise infrastructure management practices.
- Configuration Management: All configuration is centralised in
config.yaml. Theprivate/directory is only for temporary files during development. - Bootstrap Approach: The installation uses a local Kind cluster to bootstrap the installation to the target AKS cluster. The Kind cluster can be deleted after installation is complete.
Prerequisites
Required Azure Resources
Before using this reference implementation, you MUST have the following Azure resources already created and configured:
- AKS Cluster (1.27+) with:
- OIDC Issuer enabled (
--enable-oidc-issuer) - Workload Identity enabled (
--enable-workload-identity) - Sufficient node capacity for all components
- For example, the demonstration AKS cluster created with the helper task
test:aks:createhas node pool with the node size set tostandard_d4alds_v6by default
- For example, the demonstration AKS cluster created with the helper task
- OIDC Issuer enabled (
- Azure DNS Zone
- A registered domain with Azure DNS as the authoritative DNS service
Important:
- All Azure resources must be in the same subscription and resource group
- Azure Key Vault and Crossplane Workload Identity are NO LONGER prerequisites - they will be created automatically during installation
- These resources are prerequisites and must be provisioned using your organisation's preferred infrastructure management approach (Terraform, Bicep, ARM templates, etc.). The tasks in this repository that create Azure resources (
test:aks:create, etc.) are helper functions for demonstration purposes only and are NOT recommended for production deployments.
Setup Guidance for Azure Resources
For setting up the prerequisite Azure resources, refer to the official Azure documentation:
GitHub Integration Setup
Create GitHub App for Backstage
You need a GitHub App to enable Backstage integration with your GitHub organisation.
Option 1: Using Backstage CLI (Recommended)
npx '@backstage/cli' create-github-app ${GITHUB_ORG_NAME}# Select appropriate permissions when prompted# Install the app to your organisation in the browser# Move the credentials file to a temporary locationmkdir -p privateGITHUB_APP_FILE=$(ls github-app-* | head -n1)mv ${GITHUB_APP_FILE} private/github-integration.yaml
Option 2: Manual Creation
Follow Backstage GitHub App documentation and save the credentials as private/github-integration.yaml.
Note: The
private/directory is for temporary files during development/testing only. All configuration must be properly stored inconfig.yamlfor the actual deployment.
Create GitHub Token
Create a GitHub Personal Access Token with these permissions:
- Repository access for all repositories
- Read-only access to: Administration, Contents, and Metadata
Save the token value temporarily as you will need it when creating the config.yaml file.
Installation Flow
The installation process follows this new pattern using a local Kind cluster as bootstrap:
- Configure your environment settings in
config.yaml - Set up Azure credentials in
private/azure-credentials.json - Run
task installwhich:- Creates a local Kind cluster using the configuration in
kind.yaml - Deploys components to Kind cluster via Helmfile as specified in
bootstrap-addons.yaml - Crossplane on Kind cluster connects to Azure and creates necessary cloud resources:
- Crossplane Workload Identity
- Azure Key Vault
- DNS records (
*.local.<domain>) for observing local installation
- Deploys CNOE components to the target AKS cluster via ArgoCD
- Creates a local Kind cluster using the configuration in
- Monitor installation progress via local ArgoCD at
argocd.local.<domain>and Crossplane atcrossplane.local.<domain> - Once installation is complete, the local Kind cluster is no longer needed
Security Notes
- GitHub App credentials contain sensitive information - handle with care
- Azure credentials are stored in
private/azure-credentials.json(copy from your Azure credential) - Configuration secrets are stored in Azure Key Vault (created automatically)
- Workload Identity is used for secure Azure authentication (created automatically)
- TLS encryption is used for all external traffic
Installation Steps
Installation Requirements
- Azure CLI (2.13+) with subscription access
- kubectl (1.27+)
- kubelogin for AKS authentication
- yq for YAML processing
- helm (3.x)
- helmfile
- task (Taskfile executor)
- kind for local Kubernetes cluster
- yamale for configuration validation
- A GitHub Organisation (free to create)
1. Configure the Installation
Copy and customise the configuration:
cp config.yaml.template config.yaml# Edit config.yaml with your values
Set up Azure credentials:
# Copy your Azure credentials to the private directorycp private/azure-credentials.template.json private/azure-credentials.json# Edit private/azure-credentials.json with your actual Azure credentials
Key configuration sections in config.yaml:
repo: The details of the repository hosting the reference azure implementation codecluster_name: Your AKS cluster namesubscription: Your Azure subscription IDlocation: The target Azure regionresource_group: Your Azure resource groupcluster_oidc_issuer_url: The AKS OIDC issuer URLdomain: The base domain name you will be using for exposing servicesgithub: GitHub App credentials (from the Github Integration Setup)
DNS and TLS Configuration
Automatic (Recommended)
- Set your domain in
config.yaml - ExternalDNS manages DNS records automatically
- Cert-manager handles Let's Encrypt certificates
Manual
- Set DNS records to point to the ingress load balancer IP
- Provide your own TLS certificates as Kubernetes secrets
2. Install Components
If installing the reference implementation on a machine for the first time run:
task init
If you haven't previously run task init, then you will be prompted to install several Helm plugins required by Helmfile when you run the next command:
# Install all componentstask install
Notes:
task installwill create a local Kind cluster and use it to bootstrap the installation to your AKS cluster- Post-installation, use
task apply(the equivalent to runninghelmfile apply) to apply updates. See the Task Usage Guidelines for more information.
3. Monitor Installation
During installation, you can monitor progress using the local Kind cluster:
# Access local ArgoCD (running on Kind cluster)# Navigate to: https://argocd.local.<your-domain># Access local Crossplane dashboard# Navigate to: https://crossplane.local.<your-domain># Get ArgoCD admin password for local clusterkubectl -n argocd get secret argocd-initial-admin-secret -o jsonpath="{.data.password}" | base64 -d
Once the AKS installation is complete, you can also access ArgoCD on the target cluster:
# Switch to AKS cluster contexttask kubeconfig:set-context:aks# Get ArgoCD admin passwordkubectl -n argocd get secret argocd-initial-admin-secret -o jsonpath="{.data.password}" | base64 -d# Access ArgoCD (running on AKS cluster)# Navigate to: https://argocd.<your-domain>
4. Get Access URLs
Use the task get:urls command to fetch all the URLs from the target AKS cluster:
task get:urls
The URL structure of the URLs will depend on the type of routing you set in the configuration. Examples of the set of URLs that can be outputted are below:
Domain-based routing (default):
- Backstage:
https://backstage.YOUR_DOMAIN - ArgoCD:
https://argocd.YOUR_DOMAIN - Keycloak:
https://keycloak.YOUR_DOMAIN - Argo Workflows:
https://argo-workflows.YOUR_DOMAIN
Path-based routing (set path_routing: true):
- Backstage:
https://YOUR_DOMAIN/ - ArgoCD:
https://YOUR_DOMAIN/argocd - Keycloak:
https://YOUR_DOMAIN/keycloak - Argo Workflows:
https://YOUR_DOMAIN/argo-workflows
5. Access Backstage
Once the Keycloak and Backstage are installed on the target AKS cluster, check you can login to the Backstage UI with a default user:
# Switch to AKS cluster contexttask kubeconfig:set-context:aks# Get user passwordkubectl -n keycloak get secret keycloak-config -o yaml | yq '.data.USER1_PASSWORD | @base64d'
Usage
See DEMO.md for information on how to navigate the platform and for usage examples.
Update Component Configurations
If you want to try customising component configurations, you can do so by updating the packages/addons/values.yaml file and using task sync to apply the updates.
Backstage Templates
Backstage templates can be found in the templates/ directory
Uninstall
# Remove all components and clean up Azure resourcestask uninstall# Clean up GitHub App and tokens manually# Delete the GitHub organisation if no longer needed
Note: The
task uninstallcommand will clean up both the local Kind cluster and remove CNOE components from the target AKS cluster. Azure resources created by Crossplane (Key Vault, Workload Identity) will also be cleaned up automatically.
Contributing
This reference implementation is designed to be:
- Forkable: Create your own version for your organisation
- Customizable: Modify configurations without changing core packages
- Extensible: Add new components following the established patterns
Troubleshooting
See TROUBLESHOOTING.md for common issues and detailed troubleshooting steps.
Potential Enhancements
The installation of this Azure reference implementation will give you a starting point for the platform, however as previously stated applications deployed in this repository are not meant or configured for production. To push it towards production ready, you can make further enhancements that could include:
- Modifying the basic and Argo workflow templates for your specific Azure use cases
- Integrating additional Azure services with Crossplane
- Configuring auto-scaling for AKS and Azure resources
- Adding OPA Gatekeeper for governance
- Integrating a monitoring stack. For example:
- Deploy Prometheus and Grafana
- Configure service monitors for Azure resources
- View metrics and Azure resource status in Backstage
- Implementing GitOps-based environment promotion:
- Development: Deploy to dev environment via Git push
- Testing: Promote to test environment via ArgoCD
- Production: Use ArgoCD sync waves for controlled rollout